In an earlier post I gave a general review of the AppleTV relative to it's out of the box functionality. That's all well and good, but the number one use of my late-EyeHome (what it spent about 95% of it's time doing) was playing TV shows I had recorded and encoded as XviD video files. Out of the box, the AppleTV doesn't play XviD files. Furthermore, the AppleTV can only access media files you manage in iTunes, and I have no intention of putting my "media library" of XviD files into iTunes.
Fortunately, almost as soon as the AppleTV was released, people started hacking it. Under the hood, the AppleTV is basically an Intel-mac running a stripped down MacOS X. As a result, the AppleTV's potential is about the same as any Mac's (which is a lot of potential!). To those hackers, especially the very fine people over at AwkwardTV: THANK YOU! You all rock.
Introduction [#]
This blog post is basically a run down of the steps I took in hacking my AppleTV and some commentary on how things went. This information is pretty well documented elsewhere, but I did hit some "snags" that I had to be creative with. Hopefully soon I'll find motivation to consider joining the AwkwardTV community and put this stuff in their Wiki. For now I'm simply documenting it here though.
Working To Get SSH Installed [#]
The first order of business the hacking sites direct you to do is throw the SSH daemon on your AppleTV. It's good advice. Once you have SSH installed, you can issue commands, upload files, whatever.
Deciding On a Hacking Method [#]
Getting SSH on the AppleTV is pretty easy, too. The hardest step for me was deciding how I wanted to do it. There are to main ways. One is to open the box, take out the hard drive, hook the hard drive up to another Mac, and copy SSH over. The second is using what the AwkwardTV community calls a Patchstick. You basically create a bare bones OS X installation on a USB drive (flashdrive or otherwise), have that OS X installation run some scripts when it boots, and then boot the AppleTV from that USB drive.
The consensus of the Interweb is that physically opening the AppleTV voids your warranty but using the Patchstick doesn't. I'm not sure how valid of a conclusion that is, but it made me inclined to try the Patchstick method.
Unfortunately, in attempting the Patchstick method, I very quickly came to a roadblock. To do the Patchstick method, you need the
boot.efi file from your AppleTV. Chicken and the egg: You need a hacked AppleTV to get the boot.efi file; you need the boot.efi file to hack your AppleTV. And, the boot.efi file is proprietary code to Apple, making it illegal to share on the internets. (Even if you could legally share it, I'm not wild about downloading OS executable code from sources I don't have a reason to trust...)Opening Up The AppleTV [#]
So, plan B - open my AppleTV up. I followed this guide from MacWorld (which is really intended at upgrading your AppleTV's hard drive, but the first step of doing that is opening the case.)
To quote MacWorld, "the biggest obstacle - and it's more a psychological one than a physical one - is that the large rubber 'foot' that covers the entire bottom of the Apple TV is attached via adhesive." In theory, if Apple were to service an AppleTV and the rubber foot wasn't as adhesive to the bottom as a brand new one, they could "tell" you hacked yours. I assume this is where the warranty concerns come in, and for me this really did create a psychological obstacle.
Some good news: if you don't fully remove the entire rubber "foot" (and you don't have to!), it's totally un-obvious from looking that you ever removed it. And it does stay fairly sticky even after first pulling it back. If you undergo this method and are really concerned, get some adhesive to re-apply to the foot after you're done. If you re-apply some adhesive, I'm not sure Apple could ever really tell you pulled it up.
After the rubber "foot," 4 screws take the base off. Four more to detach the hard drive from the base, and then the hard drive is home free for you to play with. You will need a Torx-8 and Torx-10 screwdriver. I didn't have one. My first stop to get one was Walmart. They had Torx-10 stuff, but no Torx-8. Home Depot saved the day though. (Also, a lot of the Torx offerings are referring to "Torx" as "Star" these days...)
To connect the hard drive to my PowerMac G5, I simply used a standard 2.5" inch USB drive enclosure (search NewEgg or elsewhere if you need one). It worked great.
Copying The sshd Binary [#]
The next step is simply to copy the SSH daemon (
sshd) to the hard drive. I followed these directions on the AwkwardTV Wiki. Effectively, I just created /System/Library/LaunchDaemons/ssh.plist per their example and then needed to copy over the sshd binary. Since I don't have an Intel-Mac (I have a PowerMac G5), this did present a bit of a challenge. In other places on their Wiki, and on other sites, people link to the OpenDarwin compiled binaries. The problem with that is OpenDarwin has shutdown. An alternative to this though is downloading a Darwin/X86 CD from Apple. (I downloaded from here.) It is kind of ridiculous that you have to download a 560MB CD image to get a 314kb file, but oh well. Once you download the ISO, on a Mac you can just double click it to mount the CD image as a drive. Then navigate to /Volumes/Darwin8_i386/usr/sbin and grab sshd.Boot Up With SSH [#]
Now, just simply unmount the AppleTV volumes you mounted on your Mac (drag their icons to the trash), put the drive back in the AppleTV, screw everything back in place, and plug it back in.
Hack To Your Needs [#]
With SSH installed, you can now connect via, well, SSH. (See the linked steps in the Wiki if you don't know how to do this). SSH will let you execute commands as well as use
scp to copy files over. The general way I copied files over was that I created a Downloads directory on the AppleTV (/Users/frontrow/Downloads) and copied files there first. From there I could use sudo mv to put them in protected places like /System/Library/CoreServices/Finder.app/Contents/PlugIns/.Install Perian [#]
the AppleTV uses Quicktime to play it's media files. So, to play XviD files, you can simply install Perian on the AppleTV. I just followed the directions the Perian download provided, keeping in mind the real destination I was interested in was on the AppleTV, not my local Mac.
Install the ATVFiles Plugin [#]
The next step was to be able to browse to my existing media library. To do this, I decided to use the ATVFiles Plugin (I say that like there is a choice... there really isn't). I would up making two modifications to the standard version of the plugin. First, I modified
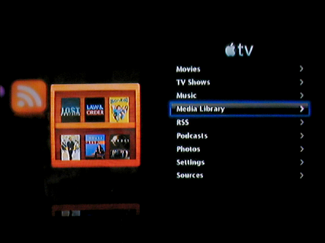
InfoPlist.strings and Localizable.strings, replacing "Files" with "Media Library" because I wanted "Media Library" to be the text displayed on my AppleTV. I also replaced the icon that shows up on the left hand side when you select the "Media Library" option.Default ATVFiles Plugin icon:

My new icon (inspired by Delicious Library):
And, here's how it ultimately looks on the TV:
Mount the Existing Media Library via AFP [#]
The final step was to mount my existing media library, which resides on another Mac, to the AppleTV so I could browse it and play files off of it. The ATVFiles Plugin is set up to let you browse the files in
/Users/frontrow/Movies, so in that directory I created a new directory called "media-1" (what my shared drive with my media files is called) and then I simply SSH'd into my AppleTV and executed the command mount_afp -r -i -o nosuid afp://[username]@192.168.0.XXX/media-1/ /Users/frontrow/Movies/media-1. The first time you do this, the command spits back a bunch of error messages, but it does work.Success! (And, OK, a couple minor issues) [#]
At this point, everything pretty much just works.
One issue I did run into was that I tried installing the AwkwardTV Loader Appliance (ATV Loader Plugin) which is an AppleTV plugin designed to let you install other AppleTV plugins. It seemed to install OK, but then trying to use it didn't work. Installing plugins "manually" isn't really that hard though, so I just removed the ATV Loader Plugin without investigating further.
As for on-going issues, I am having some problems with some of my XviD files where the AppleTV starts playing them but they have no sound and if I try to skip forward, the AppleTV chokes and gives up on the file. This happens with maybe 1 in 5 files. The files play fine locally on my G5 in VLC, and they played fine on my old EyeHome, but they don't play correctly on the AppleTV or on my G5 using Quicktime Player. If I use Quicktime Player to extract the video feed to a new Quicktime file, then extract the MP3 audio from the file using ffmpeg and then open and import that MP3 audio into the new Quicktime file, the resulting self-contained Quicktime file does play fine, so I have a fairly painless work around (I plan to write a script to figure out which files fall into this non-working category [in QuickTime Player, the "bad" files show up claiming the audio track is like 72 hours long...] and convert them all automagically for me...). It's curious that not all ffmpeg created XviD files work "as is" with Perian though.
I also had the AppleTV totally freeze up on me today (pressing buttons on the remote did cause the light on the front of it to flash, but the video abruptly stopped and I couldn't SSH into the AppleTV) while playing an XviD file. I don't expect this to be a frequent occurrence though.
Finally, with my EyeHome set up, I had a directory called "25 Newest" in my media library which had symbolic links to the 25 newest video files. So far I haven't been able to get the AppleTV (within the ATVFiles plugin) to respect symbolic links. I haven't given up, but no luck so far, so no convenient "25 Newest" listing for me at the moment...
On the whole, the hacked AppleTV is doing a great job replacing my dead EyeHome. If anyone else is looking to replace a dead EyeHome of their own, assuming they are comfortable with opening up hardware and using SSH, I'd highly recommend they consider a hacked AppleTV as well.

4 comments:
Hi - did you ever fix the symlink issue? I'm in the midst of it now having come from eyehome and it's driving me crazy!
Dan - I actually haven't taken time to further investigate the symlink issue. The latest ATV Files plug in shows what's been played which helps some, but I do still miss my old "25 newest" listing.
If I were to take a stab at trying to get around this, what I think I'd do is just have the "25 newest" or equivalent just use hard links (as opposed to symlinks) on the server's drive, and then when mounted to the AppleTV, that should work OK.
If you find a way to get the symlink stuff working, it would be great if you could share (either here in my comments, or [probably with a wider reach] on the AwkwardTV wiki).
Happy hacking.
hello my atv is frozen exactly as you describe: remote inactive except having the front les flash... Help anyone?
Anonymous - I haven't had my AppleTV freeze up on me since I think wrote this post. I suspect what I did though was simply to yank the power cord. I hate doing that to something that effectively is a computer, with a spinning hard drive, but I believe Apple actually suggests doing this for some things on their site.
Post a Comment